This post may contain affiliate links. See our Disclosure Policy for more information.

Perfect for your mermaid-themed newborn photos.
Skill Level | Intermediate
Finished Size | 24″ circumference; 20″ length


About this Pattern
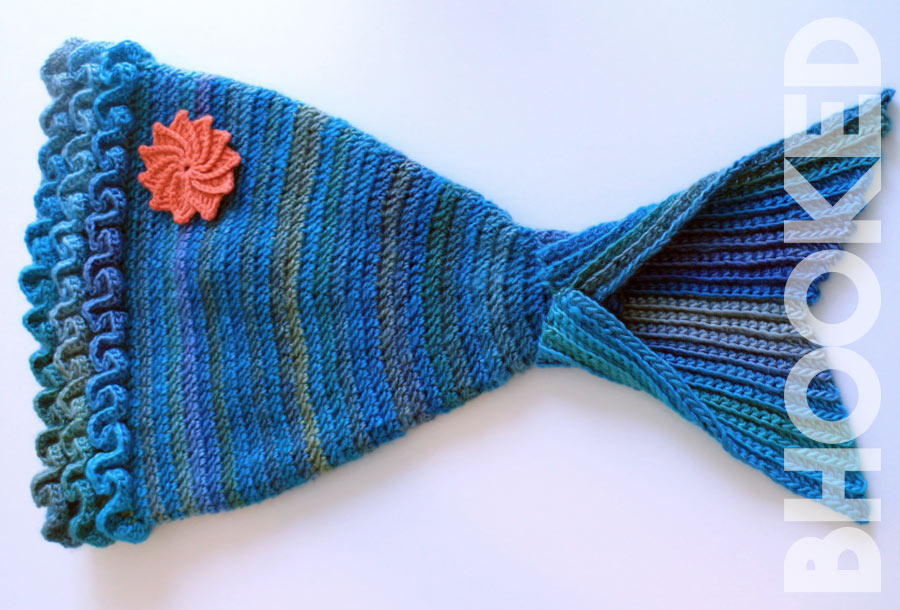
If you’re looking for a fun theme for your newborn photoshoot, how about the Mystic Mermaid Cocoon? It’s as cute as it is fun to crochet and it quickly became one of our most popular patterns.
With this project, you’ll work primarily with double crochet stitches and a yarn that creates long sweeping color transitions. You’ll learn how to crochet a ruffled border, a skill that can be used for more projects in your future!
Before you begin, review this page entirely so you understand the full scope of the project. We prepared a list of recommended supplies, abbreviations you’ll need to get started as well as a video tutorial demonstrating how to crochet the ruffles. And, of course, written instructions to complete the entire project from start to finish.
Recommended Supplies
- Approx 490 yds; Red Heart Unforgettable (colorway pictured: Tidal)
- 4.5mm Crochet hook
- Yarn needle
- Scissors
Abbreviations
This pattern is written using standard US crochet terminology.
- BLO Back Loop Only
- Ch Chain
- Dc Double Crochet
- Hdc Half Double Crochet
- Rep Repeat
- Sk Skip
- Sts Stitches

Additional Notes
Finished Size
24″ circumference;
20″ length
Gauge
8 sts x 5 rows = 2″
(double crochet)
This crochet mermaid has been recreated to include 5 sizes, updates to the fin and yarn recommendation. See the Crochet Mermaid Tail pattern here.
You’ll crochet your mermaid tail in three different sections: the body, the fin and the ruffles. Ch 3 at beginning of rounds counts as dc.
The body and fin are sewn together with a tapestry needle. The ruffles are crocheted directly to the top of the mermaid tail. This technique is very easy once you get the hang of it but the written instructions can appear somewhat confusing at first glance. To help with this, you’ll find a tutorial on this page.
Need to print this pattern?
You’ll find the full pattern for free here on this page. However, if you’d like to have a PDF version to print or save for offline use, you can purchase it from our shop.
Written Instructions
Body
Round 1: Ch 4 (first ch counts as center of ring, 3 ch counts as dc). 7 dc in first ch. Join with a slst to 3rd ch. (8 sts)
Round 2: Ch 3. 2 dc in each st. Join with a slst to 3rd chain. (16 sts)
Rounds 3-4: Ch 3. 1 dc in each st. Join with a slst to 3rd chain. (16 sts)
Round 5: Ch 3. *2 dc in next st. 1 dc in next st. Rep from * to last st. 2 dc last st. Join with a slst to 3rd chain. (24 sts)
Round 6: Ch 3. 1 dc in next st. *2 dc in next st. 1 dc in next 2 sts. Rep from * to to last st. 2 dc last st. Join with a slst to 3rd chain. (32 sts)
Round 7: Ch 3. 1 dc in each st. Join with a slst to 3rd chain. (32 stitches)
Round 8: Ch 3. 1 dc in next 2 sts. *2 dc in next st. 1 dc in next 3 sts. Rep from * to to last st. 2 dc last st. Join with a slst to 3rd chain. (40 sts)
Round 9: Ch 3. 1 dc in each st. Join with a slst to 3rd chain. (40 sts)
Round 10: Ch 3. 1 dc in next 3 sts. *2 dc in next st. 1 dc in next 4 sts. Rep from * to to last st. 2 dc last st. Join with a slst to 3rd chain. (48 sts)
Rounds 11-12: Ch 3. 1 dc in each st. Join with a slst to 3rd chain. (48 sts)
Round 13: Ch 3. 1 dc in next 4 sts. *2 dc in next st. 1 dc in next 5 sts. Rep from * to end to last st. 2 dc last st. Join with a slst to 3rd chain. (56 sts)
Round 14: Ch 3. 1 dc in each st. Join with a slst to 3rd chain. (56 sts)
Round 15: Ch 3. 1 dc in next 5 sts. *2 dc in next st. 1 dc in next 6 sts. Rep from * to to last st. 2 dc last st. Join with a slst to 3rd chain. (64 sts)
Round 16: Ch 3. 1 dc in each st. Join with a slst to 3rd chain. (64 sts)
Round 17: Ch 3. 1 dc in next 6 sts. *2 dc in next st. 1 dc in next 7 sts. Rep from * to last st. 2 dc last st. Join with a slst to 3rd chain. (72 sts)
Round 18: Ch 3. 1 dc in each st. Join with a slst to 3rd chain. (72 sts)
Round 19: Ch 3. 1 dc in next 7 sts. *2 dc in next st. 1 dc in next 8 sts. Rep from * to last st. 2 dc last st. Join with a slst to 3rd chain. (80 sts)
Round 20: Ch 3. 1 dc in each st. Join with a slst to 3rd chain. (80 sts)
Round 21: Ch 3. 1 dc in next 8 sts. *2 dc in next st. 1 dc in next 9 sts. Rep from * to last st. 2 dc last st. Join with a slst to 3rd chain. (88 sts)
Rounds 22-38: Ch 3. 1 dc in each st. Join with a slst to 3rd chain. (88 sts)
Fasten off and weave in ends.
Fin
Row 1: Ch 36. 1 sc in the 2nd chain from hook and in each ch. Turn. (35 sts)
Row 2: Ch 1. 1 sc in next 25 sts. Hdc in next 9 sts. Turn. (34 sts)
Row 3: Ch 1. Slst first 9 sts. 1 sc in last 25 sts. (34 sts)
Row 4: Ch 1. 1 sc in next 25 sts. 1 hdc in next 8 sts. (33 sts)
Row 5: Ch 1. Slst next 8 sts. 1 sc in next 25 sts. (33 sts)
Row 6: Ch 1. 1 sc in next 25 sts. 1 hdc in next 7 sts. (32 sts)
Row 7: Ch 1. Slst next 7 sts. 1 sc in next 25 sts. (32 sts)
Row 8: Ch 1. 1 sc in next 25 sts. 1 hdc in next 6 sts. (31 sts)
Row 9: Ch 1. Slst next 6 sts. 1 sc in next 25 sts. (31 sts)
Row 10: Ch 1. 1 sc in next 25 sts. 1 hdc in next 5 sts. (30 sts)
Row 11: Ch 1. Slst next 5 sts. 1 sc in next 25 sts. (30 sts)
Row 12: Ch 1. 1 sc in next 25 sts. 1 hdc in next 4 sts. (29 sts)
Row 13: Ch 1. Slst next 4 sts. 1 sc in next 25 sts. (29 sts)
Row 14: Ch 1. 1 sc in next 25 sts. 1hdc in next 3 sts. (28 sts)
Row 15: Ch 1. Slst next 3 sts. 1 sc in next 25 sts. (28 sts)
Row 16: Ch 1. 1 sc in next 25 sts. 1 hdc in next 2 sts. (27 sts)
Row 17: Ch 1. Slst next 2 sts. 1 sc in next 25 sts. (27 sts)
Row 18: Ch 1. 1 sc in next 25 sts. 1 hdc in next st. (26 sts)
Row 19: Ch 1. Slst next s. 1 sc in next 25 sts. (26 sts)
Row 20: Ch 1. 1 sc in next 25 stitches. 2 hdc in last st. (27 sts)
Row 21: Ch 1. Slst next 2 sts. 1 Sc in next 25 sts. (27 sts)
Row 22: Ch 1. 1 sc in next 25 sts. 1 hdc in next st. 2 hdc in last st. (28 sts)
Row 23: Ch 1. Slst next 3 sts. 1 sc in next 25 sts. (28 sts)
Row 24: Ch 1. 1 sc in next 25 sts. 1 hdc in next 2 sts. 2 hdc in last st. (29 sts)
Row 25: Ch 1. Slst next 4 sts. 1 sc in next 25 sts. (29 sts)
Row 26: Ch 1. 1 sc in next 25 sts. 1 hdc in next 3 sts. 2 hdc in last st. (30 sts)
Row 27: Ch 1. Slst next 5 sts. 1 sc in next 25 sts. (30 sts)
Row 28: Ch 1. 1 sc in next 25 sts. 1 hdc in next 4 sts. 2 hdc in last st. (31 sts)
Row 29: Ch 1. Slst next 6 sts. 1 sc in next 25 sts. (31 sts)
Row 30: Ch 1. 1 sc in next 25 sts. 1 hdc in next 5 sts. 2 hdc in last st. (32 sts)
Row 31: Ch 1. Slst next 7 sts. 1 sc in next 25 sts. (32 sts)
Row 32: Ch 1. 1 sc in next 25 sts. 1 hdc in next 6 sts. 2 hdc in last st. (33 sts)
Row 33: Ch 1. Slst next 8 sts. 1 sc in next 25 sts. (33 sts)
Row 34: Ch 1. 1 sc in next 25 sts. 1 hdc in next 7 sts. 2 hdc in last st. (34 sts)
Row 35: Ch 1. Slst next 9 sts. 1 sc in next 25 sts. (34 sts)
Row 36: Ch 1. 1 sc in next 25 sts. 1 hdc in next 8 sts. 2 hdc in last stitch. (35 sts)
Row 37: Ch 1. Slst next 10 sts. 1 sc in next 25 sts. (35 sts)
Fasten off and weave in your ends. Wet block the tail before sewing it to the cocoon.
Assembly
Step 1: Lay the cocoon over the fin so the base is directly centered and overlapping the tail approximately 2 inches.
Step 2: Fold the right side corner of the tail to the left. With yarn needle, whip stitch the corner of the tail over the cocoon.
Step 3: Fold the left side corner of the tail to the right. Whip stitch it in place with yarn needle. Make any additional whip stitches to make the fin more secure then weave in your ends.
Ruffles
Fasten on at the back, wrapping it around the chain 3 of your join on the second to last round.
*4 dc around ch. Rotate work 90 degrees counter clockwise. 3 dc 3 in between next 2 dc. Rotate work 90 degrees counter clockwise. 5 dc around next dc. Rotate work 90 degrees clockwise. 3 dc in between next 2 dc. Rotate work 90 degrees clockwise. 5 dc around next dc.
Rep from * around circumference of work. Join with a slst to 3rd chain and fasten off.
Fasten on again in the same place on the back of the cocoon but skip one row down. Rep above steps for the previous round of ruffles for a total of 3 ruffle rounds.
By using this pattern, you agree to our terms of use:
This pattern is for personal use only. You agree not to modify, publish, transmit, sell, create derivative works or in any way exploit any of the content within this page, in whole or in part. If you wish to share this pattern, share a link to this webpage only. You may sell finished items made from this pattern.
Copyright, B.Hooked Crochet, LLC
Step-by-Step Tutorial
Video not displaying? Watch this tutorial on YouTube instead.
Left-Handed Tutorial on YouTube