If you’ve ever started a crochet project in the round, you’ve probably seen the term magic circle (or magic ring) pop up in a pattern. At first glance, it might seem a little tricky, but don’t worry—it’s easier than it looks! The magic circle is a simple technique that creates a tight, adjustable center for your crochet rounds, perfect for projects like hats, amigurumi, or coasters.
Crocheting a circle may seem intimidating at first, but it’s really simple once you memorize a few basic principles.
UPDATED: JANUARY 21, 2025 BY BRITTANY
This post may contain affiliate links. See our Disclosure Policy for more information.

In this guide, I’ll walk you through the steps to master the magic circle (and answer a few questions along the way). Whether you’ve tried it before or are just curious about what makes it magic, you’re in the right place. Let’s get started!
Here’s a quick overview of the topics we will cover in this article:
- What is the Magic Circle (Magic Ring) in Crochet?
- How Secure is the Magic Circle?
- How to Make a Magic Circle Step-by-Step
- Watch How to Make the Magic Circle (Video Tutorial)
- Mistakes to Avoid with the Magic Circle
- When to Use the Magic Circl (and When Not To)
What is the Magic Circle (Magic Ring) in Crochet?
When starting a crochet project in the round, the foundation you create at the center is key. One common way to start a crochet circle is with a chain loop, where the chain stitches form a fixed (or “static”) foundation. This works well enough, but it often leaves a small hole in the center of the work.
Sometimes, this small hole is part of the overall design—like you might see in a granny square, for instance. But for projects like amigurumi or hats, you don’t want that little hole at the center.
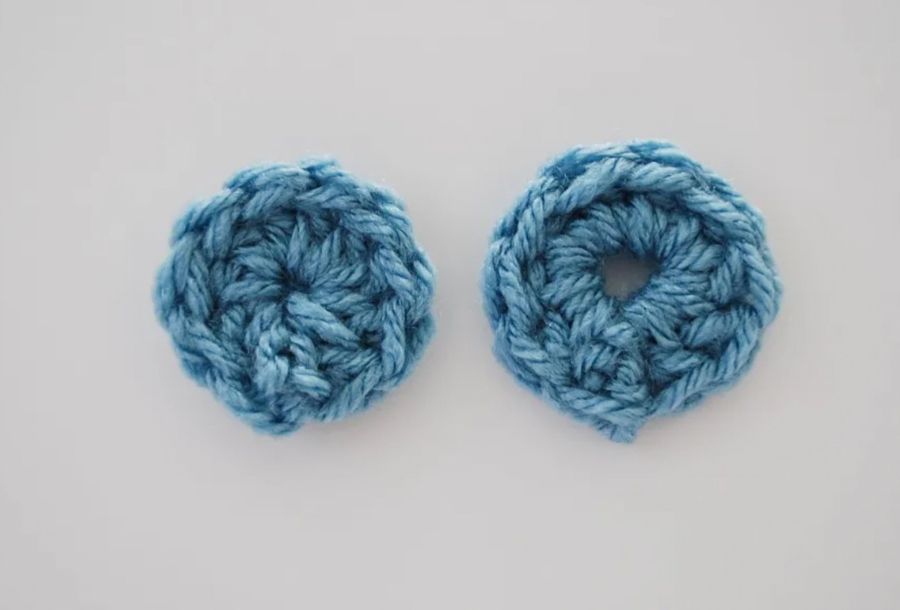
The magic circle, or magic ring, takes a different approach. Instead of a fixed foundation, you create a loop of yarn that acts as a sliding ring. This allows you to crochet your first round of stitches into the loop, and then pull the tail to tighten the ring—just like a drawstring—completely closing up the center.
By using the magic circle, you can create a neat, gap-free starting point for your project. This is especially useful for projects like hats, amigurumi, coasters, or anything else worked in the round.
How Secure is the Magic Circle?
Now, you might be wondering: “If the magic circle creates a sliding foundation, won’t it eventually loosen or create a hole?” Great question! The good news is that when done correctly, the magic circle stays secure. Just use the tail to lock it in place, and it will stay tight.
This technique gives your crochet projects a polished, professional look while eliminating the hole that can happen with a chain loop. Plus, once you get the hang of it, you’ll likely find it’s faster and more convenient!
How to Make the Magic Circle (Magic Ring)
To make a magic circle, think of it as creating a flexible foundation rather than a traditional stitch. You can use any stitch you prefer within the magic circle. For this example, we’ll walk through the steps using three of the most common stitches: single crochet, half double crochet, and double crochet.
- Yarn: For practice, choose medium-weight yarn (like worsted weight). You only need a small amount to make a few stitches, so it’s perfect for testing this technique.
- 5.5 mm Crochet Hook. You can use a different size if you’re using a different yarn, but a 5.5 mm hook works well for practice.
Now that you have your supplies ready, let’s get started with making the magic circle using single crochet stitches. Gather your yarn and hook, and follow along as we break it down!
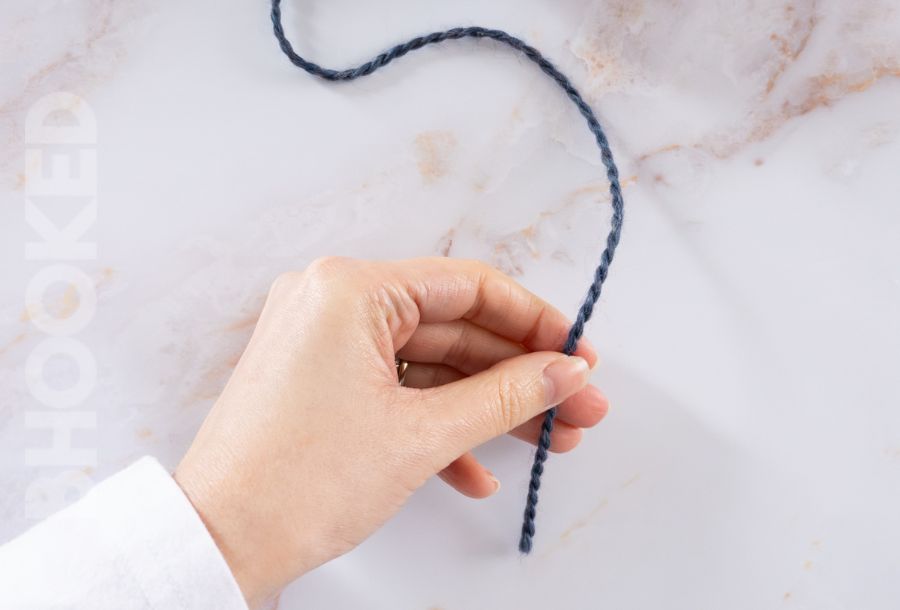
Step 1: Hold the tail of your yarn in your non-dominant hand, with the tail facing you and the working yarn away from you.
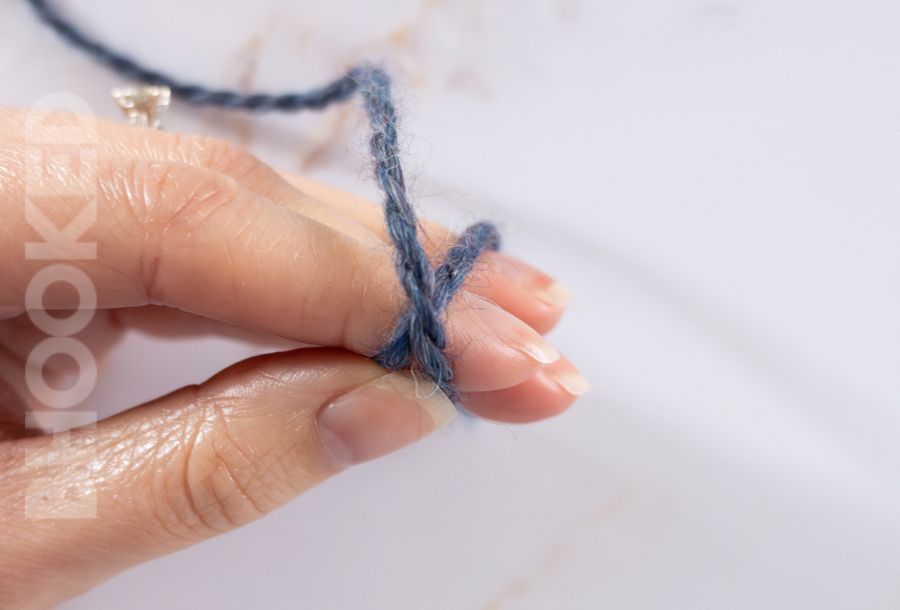
Step 2: With the tail steady, wrap the working yarn around your first two fingers twice, creating two loops.

Step 3: Cross the working yarn over the first loop so that it hangs further back.
Step 4: Carefully release your two fingers, making sure the yarn stays in the same position.
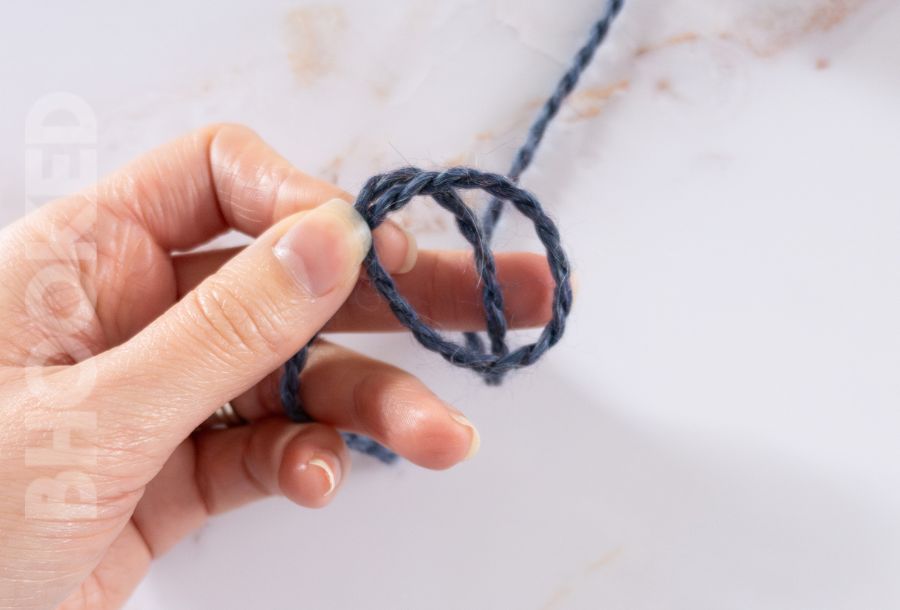
Step 5: Grab the working yarn strand with your crochet hook, and pull it through the loops on your fingers to form a chain. This will lock everything in place, but try not to disturb the tail.
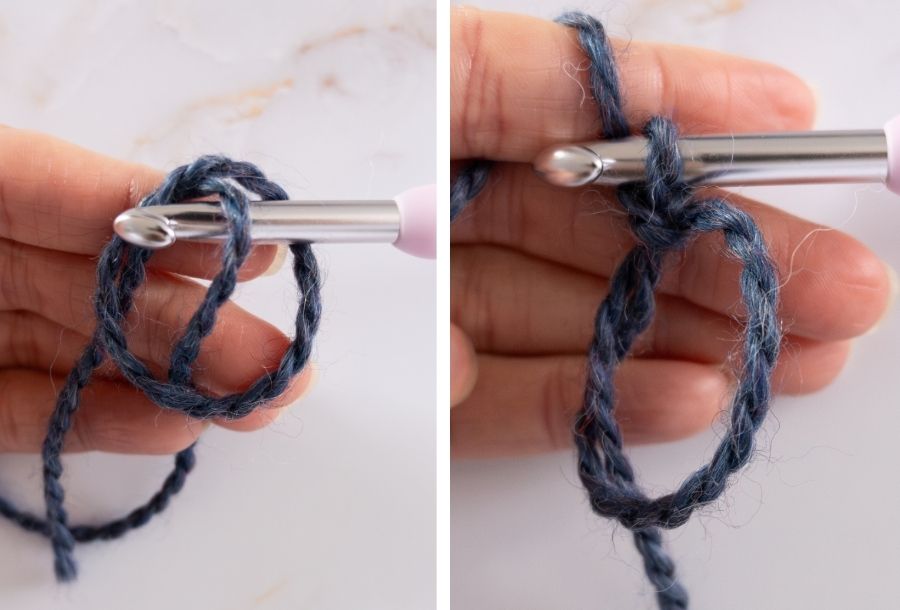
Step 6: Hold the ring with both fingers to keep the yarn in position and make it easier to crochet stitches into the circle.
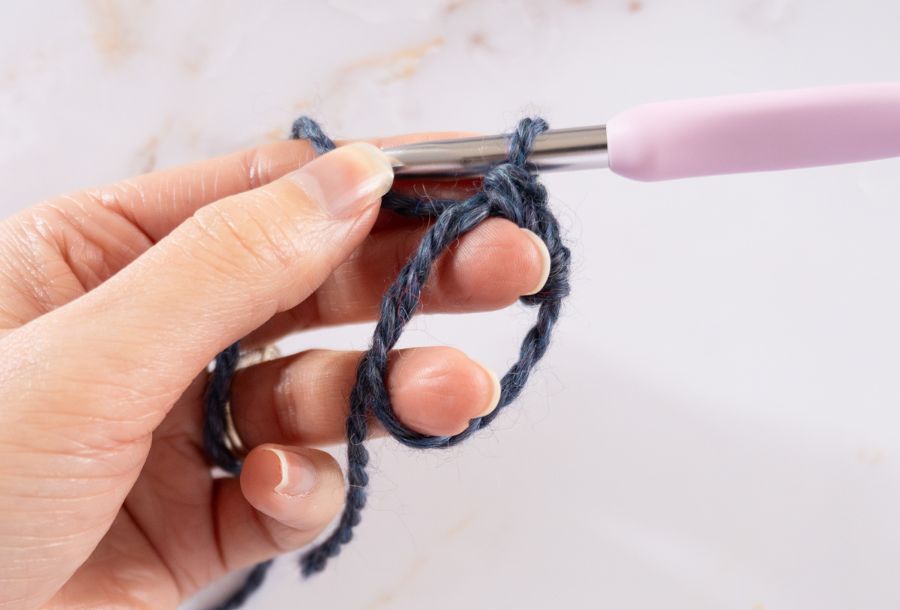
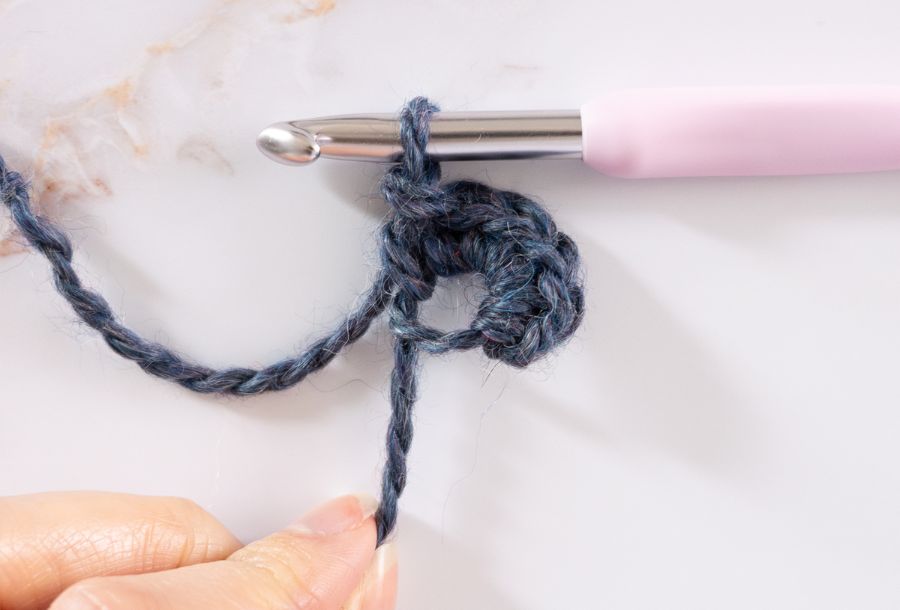
Step 7: Crochet as many stitches as your pattern calls for into the ring (single crochet, half double crochet, or double crochet—whatever you need). Make sure you crochet around the tail as well!
Step 8: Once you’ve made all your stitches, pull the tail of the yarn to tighten the circle and close up the center.
Step 9: Use the tail and a yarn needle to secure the opening. Thread the tail through the center of the ring, weaving it around a few times to ensure the opening stays tightly closed.

Want a fun way to practice the magic circle? Try my cute little crochet heart! It uses a few stitches to turn your magic circle into a cute heart you can attach to other projects.
Watch How to Make the Magic Circle in this Quick Video
Sometimes it’s easier to see the technique in action, and I’ve got you covered! Below is a video that walks you through the magic circle step-by-step. Follow along with me as I demonstrate the process, and feel free to pause and rewind as needed. It’s a great way to reinforce what you’ve just learned!
Mistakes to Avoid with the Magic Circle
While the magic circle is a super handy technique, it can take a little practice to master. Let’s go over some common mistakes and how to avoid them, so you can work with confidence!
1. Leaving a Gap in the Center
One of the most common issues beginners face is leaving a small gap in the center of the ring. This often happens if the tail isn’t pulled tight enough after completing the first round of stitches. To avoid this, make sure you give the tail a good pull once you’ve crocheted all your stitches into the ring. If you notice a gap even after pulling the tail, you can gently tighten the loop further and adjust your stitches to close it up.
2. Tightening the Circle Too Much
On the flip side, if you pull the tail too tightly before you’ve finished crocheting the first round, you may have trouble getting your stitches into the ring. The magic circle should remain adjustable, so you can crochet your stitches comfortably. If you find the circle is too tight to work into, simply loosen the tail a little, giving you more room to stitch.
3. Not Securing the Tail Properly
It’s easy to forget, but securing the tail after you’ve tightened the magic circle is key to ensuring your work stays intact. After pulling the tail to close the center, make sure you weave in the loose end securely. This will prevent the circle from loosening later on, especially if you’re working on a project that will get a lot of handling (like amigurumi or a hat). Weaving the tail in helps lock everything in place.
When to Use the Magic Circle (and When Not To)
The magic circle is a fantastic technique, but it’s not always necessary for every project. Knowing when to use it can help you achieve the best results. Here’s a breakdown of when the magic circle shines—and when you might want to stick with other methods.
Great for:
- Amigurumi: If you’re crocheting small, stuffed toys, the magic circle is ideal. It ensures a tight center that won’t leave any gaps, which is especially important when the pieces need to be stuffed.
- Hats: When working in the round for a hat, using the magic circle helps create a neat, gap-free crown that looks polished from the start.
- Coasters, Potholders, and Other Flat Circles: For projects that start with a circle and need a clean, solid center, the magic circle is perfect.
- Granny Squares (if the hole in the center isn’t a part of the design): If you want to minimize the hole in your center for your square, the magic circle is a good choice to keep it tight and neat.
Not as necessary for:
- Granny Squares (with an intentional hole): In traditional granny square patterns, the small hole in the center is part of the design. If that hole is part of your project’s aesthetic, you don’t need to bother with the magic circle. A simple chain loop will do the trick here.
- Other Lace or Openwork Projects: If your project involves a more open structure (like lace), you might not need the tightly closed center the magic circle provides. A chain loop may be more in line with the overall style.
In short, the magic circle is best when you need a tight, secure center. For projects where a bit of space in the middle is part of the look, or where you’re working with a loose tension, the magic circle isn’t necessary.
Now that you’ve learned how to start a crochet project with the magic circle, you’re well on your way to creating perfect, gap-free circles for your crochet projects. The magic circle technique opens up a world of possibilities, from hats to amigurumi to coasters, giving your work a polished, professional look from the very start.
If you’re ready to take your circular crochet skills even further, I’ve got you covered! Check out my full guide on how to crochet a circle, where I’ll walk you through everything from basic circles to advanced techniques. With these resources, you’ll be able to confidently crochet circles of all sizes and shapes for any project you can imagine.
Keep practicing, and don’t forget—crochet is all about enjoying the process and growing your skills along the way. Happy hooking!