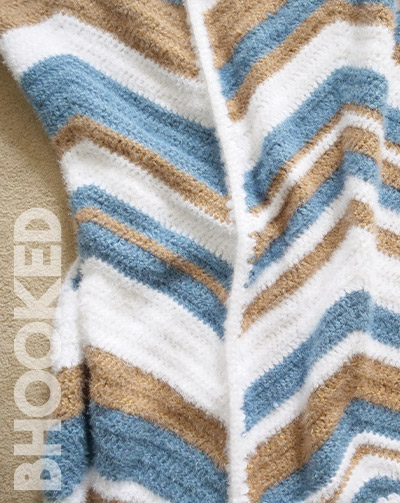
The softest and coziest blanket you’ll ever wrap yourself in.
Skill Level | Easy
Finished Size | 54″ x 54″
Project sponsored by Red Heart Yarns


About this Pattern
If you’re looking for an interesting way to crochet a blanket, you’re in the right place. Our Hygge crochet blanket is crocheted in three panels that are joined to create the coziest blanket you’ll ever wrap up in.
With this project you’ll get lots of practice with double crochet stitches as well as learn how to join panels, a technique you can apply to all sorts of projects.
Before you begin, review this page entirely so you understand the full scope of the project. We prepared a list of recommended supplies and abbreviations you’ll need to get started as well as a video tutorial and written instructions to walk you through the entire process.
Recommended Supplies
- Approx 2,376 yds; Red Heart Hygge yarn; 18 skeins
- Color A – Almond; 792 yds
- Color B – White; 792 yds
- Color C – Slate Blue; 792 yds
- 6.5 mm Crochet Hook
- Stitch Marker
- Yarn Needle
- Scissors
Abbreviations
This pattern is written using standard US crochet terminology.
- Ch Chain
- Dc Double Crochet
- Dc2Tog Double Crochet Two Together
- PM Place Marker
- Rem Remaining
- RS Right Side
- Sk Skip
- Slst Slip Stitch
- St(s) Stitch(es)
- WS Wrong Side
Additional Notes
Finished Size
54″ x 54″
(unblocked)
Gauge
12 sts x 4 rows = 4″
(double crochet)
Additional Notes: This blanket is worked in three separate panels and joined together. Each panel uses the same stitch pattern with a different stripe pattern. Use the written instructions for the stitch pattern and refer to the color pattern for each panel.
Need to print this pattern?
You’ll find the full pattern for free here on this page. However, if you’d like to have a PDF version to print or save for offline use, you can purchase it from our shop.
Written Instructions
Panel Stitch Pattern – Make 3 (refer to stripe pattern for each panel)
Row 1(RS): Ch 5. 1 dc in 3rd ch. 3 dc in next ch (pm in middle st). 2 dc in last ch. Turn.
Rows 2-9: Ch 2 (counts as dc). 2 dc in first st. 1 dc in each st to marker. 3 dc in marked st (pm in middle st). 1 dc in each st to last. 3 dc in last st. Turn.
Rows 10-81: Ch 2 (does not count as st). Dc2tog. 1 dc in each st to marker. 3 dc in marked st (pm in middle st). 1 dc in each st to last 2. Dc2tog. Fasten off.
Panel Shaping
Row 1 (RS): Fasten on in edge st along the top of the panel in the same color as the first row of the panel. Use this color throughout this section. Ch 2 (does not count as st), dc2tog (first st and 2nd st). 1 dc next 3 sts. Slst next st. Fasten off. Do not turn.
Row 2 (RS): With the same color, fasten on in dc2tog from 1st row. Ch 2 (does not count as st), dc2tog (first st and 2nd st). 1 dc next 2 sts. 1 dc in st with slst from 1st row. 1 dc next 4 sts. Slst next st. Fasten off. Do not turn.
Row 3 (RS): With the same color, fasten on in dc2tog from 2nd row. Ch 2 (does not count as st), dc2tog (first st and 2nd st). 1 dc next 6 sts. 1 dc in st with slst from 2nd row. 1 dc next 4 sts. Slst next st. Fasten off. Do not turn.
Row 4 (RS): With the same color, fasten on in dc2tog from 3rd row. Ch 2 (does not count as st), dc2tog (first st and 2nd st). 1 dc next 10 sts. 1 dc in st with slst from 3rd row. 1 dc next 4 sts. Slst next st. Fasten off. Do not turn.
Row 5 (RS): With the same color, fasten on in dc2tog from 4th row. Ch 2 (does not count as st), dc2tog (first st and 2nd st). 1 dc next 14 sts. 1 dc in st with slst from 4th row. 1 dc next 2 sts. Slst next st. Fasten off. Do not turn.
Row 6 (RS): With the same color, fasten on in dc2tog from 5th row. Ch 2 (does not count as st), dc2tog (first st and 2nd st). 1 dc next 16 sts. 1 dc in st with slst from 5th row. 1 dc next 3 sts. Slst marked st. Fasten off. Weave in your ends.
Flip the panel over and repeat rows 1-6 with the same color.
Panel 1 Stripe Pattern
- 4 rows A
- 2 rows B
- 5 rows C
- 4 rows A
- 6 rows B
- 3 rows C
- 1 row A
- 2 rows C
- 4 rows B
- 2 rows B
- 5 rows C
- 4 rows B
- 6 rows A
- 3 rows C
- 1 row B
- 2 rows C
- 4 rows A
- 2 rows B
- 5 rows C
- 4 rows A
- 6 rows B
- 3 rows C
- 1 row A
- 2 rows C
Panel 2 Stripe Pattern
- 2 rows C
- 2 rows B
- 1 row A
- 1 row B
- 3 rows C
- 4 rows A
- 2 rows B
- 3 rows C
- 5 rows B
- 2 rows A
- 2 rows B
- 2 rows C
- 2 rows A
- 1 row B
- 1 row A
- 3 rows C
- 4 rows B
- 2 rows A
- 3 rows C
- 5 rows A
- 2 rows B
- 2 rows A
- 2 rows C
- 2 rows B
- 1 row A
- 1 row B
- 3 rows C
- 4 rows A
- 2 rows B
- 3 rows C
- 5 rows B
- 2 rows A
- 2 rows B
Panel 3 Stripe Pattern
- 3 rows A
- 3 rows C
- 2 rows B
- 4 rows A
- 1 row C
- 2 rows B
- 1 row A
- 2 rows B
- 2 rows C
- 4 rows A
- 3 rows C
- 3 rows B
- 3 rows C
- 2 rows A
- 4 rows B
- 1 row C
- 2 rows A
- 1 row B
- 2 rows A
- 2 rows C
- 4 rows B
- 3 rows C
- 3 rows A
- 3 rows C
- 2 rows B
- 4 rows A
- 1 row C
- 2 rows B
- 1 row A
- 2 rows B
- 2 rows C
- 4 rows A
- 3 rows C
Panel Border
Round 1: With right side facing up, fasten on color B on the side of the last row of the long edge. Ch 2 (counts as Dc). Evenly space 162 dc along the first long edge. 3 in corner st. 2 dc in side of every row along the short edge. 3 dc in corner st. Evenly space 162 dc along the next long edge. 3 dc in corner st. 1 dc every stitch along top edge. Join with a slst to 2nd ch. Fasten off.
Repeat for each panel.
Join the Panels (in any order you like)
Step 1: Orient all three panels so the right side is facing up and they are all pointing in the same direction.
Step 2: With color B, fasten on in the first border stitch of two of the panels. 1 slst in every stitch of the long edge. Fasten off.
Step 3: With color B, fasten on in the first border stitch of the remaining panels. 1 slst in every stitch of the long edge. Fasten off.
Step 4: Weave in all the ends.
By using this pattern, you agree to our terms of use:
This pattern is for personal use only. You agree not to modify, publish, transmit, sell, create derivative works or in any way exploit any of the content within this page, in whole or in part. If you wish to share this pattern, share a link to this webpage only. You may sell finished items made from this pattern.
Copyright, B.Hooked Crochet, LLC
Step-by-Step Tutorial
Video not displaying? Watch this tutorial on YouTube instead.
Left-Handed Tutorial on YouTube