This post may contain affiliate links. See our Disclosure Policy for more information.

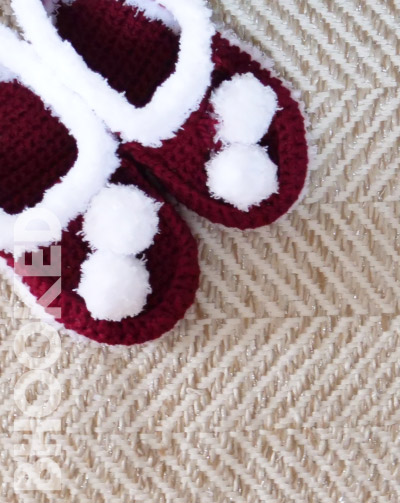
The everyday pair of house shoes to keep your feet cozy.
Skill Level | Intermediate
Available Sizes | S (6-7); M (8-9); L (10)
Project sponsored by Yarnspirations

introduction
About this Pattern
If you’re looking for a cozy project to keep your toes warm this fall and winter, you’re in the right place. Our basic crochet house shoes are a fun weekend project you can enjoy all week long.
With this project you’ll learn how to crochet the basic sole shape, a skill you can apply to any crochet slipper. Then you’ll learn how to construct the sides and top of the foot.
Before you begin, review this page entirely so you understand the full scope of the project. We prepared a list of recommended supplies and abbreviations you’ll need to get started as well as video tutorials and written instructions to walk you through our basic crochet house shoes from start to finish.
getting started
Recommended Supplies
- Approx 280 yds; Patons Shetland Chunky; (Colorway pictured: Wine)
- Approx 45 yds; Bernat Pipsqueak; (Colorway pictured: Whitey White)
- 5.5 mm Crochet Hook
- Yarn Needle
- Scissors
FAQ: Can I use a different yarn?
Sure, as long as it’s in the same weight category. Check your gauge and adjust as needed so the sizing comes out right. The recommended yarn amount will likely be different too.
Yarn Substitution Resources:
The Ultimate Guide to Substitute Yarn
Not an Amazon Prime member? Get a free 30 day trial on us so you can unlock unlimited, free, two-day shipping on all sorts of stuff (yes, even yarn!) and instant access to thousands of movies, TV shows and books. Try Amazon Prime Free for 30 Days
Disclosure: As an Amazon Associate (and at no additional cost to you) I earn a small commission from qualifying purchases if you use the links below. Please understand I have experience with these products & recommend them because they are optimal for this pattern, not because of the commission I make as a result of you buying them. Using these links is not required but is a big support!
pattern details
Abbreviations
This pattern is written using standard US crochet terminology.
- Ch Chain
- Hdc Half Double Crochet
- Hdc2tog Half Double Crochet Two Together
- Hk Hook
- Rep Repeat
- Rem Remaining
- Sc Single Crochet
- St(s) Stitches

pattern notes
Additional Notes
Finished Size
SM (6-7); MD (8-9);
LG (10)
Gauge
7 sts x 8 rows = 2″
(single crochet)
These basic crochet house shoes come together in three main steps. The soles are worked first. Then the sides are added and the top is crocheted. And finally, it all comes together with a few assembly and finishing steps. You’ll finde three tutorials for this project to walk you through it all.
Additional Notes: Chain one at beginning of row does not count as a stitch. Sizing instructions are given as follows:
S(M, L)
printable pattern
Need to print this pattern?
You’ll find the full pattern for free here on this page. However, if you’d like to have a PDF version to print or save for offline use, you can purchase it from our shop.
the pattern
Written Instructions
Sole (Make 2)
Row 1: With chunky yarn, ch 4(5, 6). 1 sc in 2nd ch from hk and in each rem ch. Turn.
Rows 2-5: Ch 1. 2 sc in first st. 1 sc in each st to last. 2 sc in last st. Turn. 11(12, 13) sts at end of row 5.
Row 6: Ch 1. 1 sc in every st. Turn.
Repeat: Rep row 6 until work measures 6(7.5, 9.5)” from starting edge.
Next 4 rows: Ch 1. Sc2tog. 1 sc in each st to last two sts. Sc2tog. Turn 3(4, 5) sts at end of last row.
Do not fasten off.
Sole Border
Round 1: Ch 1. Evenly space 62(72, 88) around sole.
Fasten off.
Sides
Round 1: Join Pipsqueak yarn in any heel stitch. Ch 1. 1 sc in same st as ch 1. 1 sc in each rem st. Join with a slst to first st. Break Pipsqueak yarn and add chunky yarn in last st.
Round 2: Ch 1. 1 hdc in same st as ch 1. 1 Hdc in each rem st. Join with a slst to first st.
Round 3: Ch 1. Hdc2tog. 1 hdc in each st to last two sts. Hdc2tog. Join with a slst to first st. 60(70, 86) sts. Fasten off.
Top of House Shoe
Row 1: Ch 4(5, 6). 1 sc in 2nd ch from hk and in each rem ch. Turn.
Rows 2-5: Ch 1. 2 sc in first st. 1 sc in each st to last. 2 sc in last st. Turn. 11(12, 13) sts at end of row 5.
Row 6: Ch 1. 1 sc in every st. Turn.
Repeat: Rep row 6 until work measures 4(5, 6)” from starting edge. Fasten off.
Assembly & Finishing
Step 1: Align top of slipper in toe of sole. With chunky yarn, fasten on at one end of top. Working through top of the slipper first and the sts of the last round of the sole, evenly space 32(40, 56) sts. Fasten off.
Step 2: Fasten on chunky yarn in st next to first st worked for top. Ch 1.1 hdc in same st as ch 1. 1 hdc in each st to last two. Hdc2tog. Join with a slst to first st.
Step 3: Ch1. 1 hdc in same st as ch 1. 1 hdc in each st to last two. Hdc2tog. Join with a slst to first st.
Step 4: With a yarn needle, use tails to secure the sides with the top of the slipper.
Step 5: Fasten on Pipsqueak yarn in any heel st. Ch 1. 1 hdc in same st as ch 1. 1 hdc in each st to the top junction. 1 hdc in each stitch of the top. Continue working 1 hdc in each rem st. Join with a slst to first st.
Step 6: Ch 1. 1 hdc in same st as ch 1. 1 hdc in each rem st. Join with a slst to first st.
Step 7: Make two 1.5″ pompoms using the Pipsqueak yarn and secure with chunky yarn to front of slippers.
By using this pattern, you agree to our terms of use:
This pattern is for personal use only. You agree not to modify, publish, transmit, sell, create derivative works or in any way exploit any of the content within this page, in whole or in part. If you wish to share this pattern, share a link to this webpage only. You may sell finished items made from this pattern.
Copyright, B.Hooked Crochet, LLC
see how it’s done
Tutorial 1: The Sole
Video not displaying? Watch this tutorial on YouTube instead.
Left-Handed Tutorial on YouTube
see how it’s done
Tutorial 2: The Sides & Top
Video not displaying? Watch this tutorial on YouTube instead.
Left-Handed Tutorial on YouTube
see how it’s done
Tutorial 3: Assembly & Finishing
Video not displaying? Watch this tutorial on YouTube instead.
Left-Handed Tutorial on YouTube


