This post may contain affiliate links. See our Disclosure Policy for more information.
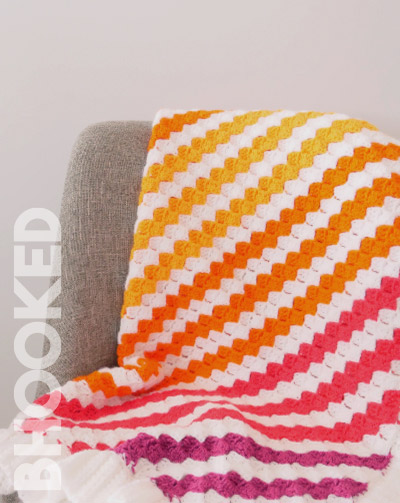
The crochet blanket that’ll catch anyone’s eye.
Skill Level | Intermediate
Finished Size | 38.5″ x 38.5″


About this Pattern
If you’re looking for a corner to corner baby blanket pattern with lots of color and a unique border, you’re in the right place. Our Baby Brights Corner to Corner Baby Blanket uses analogous colors to create a beautiful gradient.
With this project you’ll learn the basics of corner to corner crochet by incorporating those lessons in a project you’ll love. You can also dabble with color theory to put together an eye-catching color palette.
Recommended Listening: Color Theory and Crochet on The BHooked Podcast
Before you begin, review this page entirely so you understand the full scope of the project. We’ve prepared a list of recommended supplies and abbreviations you’ll need to get started, a video tutorial and written instructions to complete this corner to corner baby blanket from start to finish.
Recommended Supplies
- Approx 1,425 yds; Paintbox Simply Aran
- Color A – Raspberry Pink; 58 yds
- Color B – Lipstick Pink; 127 yds
- Color C – Blood Orange; 201 yds
- Color D – Seville Orange; 133 yds
- Color E – Paper White; 902 yds
- 5.5 mm Crochet Hook
- Yarn Needle
- Scissors
Abbreviations
This pattern is written using standard US crochet terminology.
- BLO Back Loop Only
- Ch Chain
- Dc Double Crochet
- Hdc Half Double Crochet
- Hk Hook
- Rep Repeat
- Rem Remaining
- Sc Single Crochet
- Slst Slip Stitch
- Sp Space
- St(s) Stitch(es)
Additional Notes
Finished Size
38.5″ x 38.5″
Gauge
6 tiles = 4″
Additional Notes: Carry the yarn between the contrast color and main color to reduce the number of ends to weave in. Alternatively, you can fasten off at the end of each color transition and attach the new color when indicated.
Chain one of border rows do not count as a stitch.
Need to print this pattern?
You’ll find the full pattern for free here on this page. However, if you’d like to have a PDF version to print or save for offline use, you can purchase it from our shop.
Written Instructions
Row 1: With E, Ch 6. 1dc in 4th ch from hk and in next 2 ch. Turn. (one tile)
Row 2: Ch 6. 1 dc in 4th ch from hk and in next 2 ch. (slst, ch 3, 3 dc) in ch-3 sp of previous row. Change to color A in last dc of row. Turn. (two tiles)
Row 3: With color A, ch 6. 1 dc in 4th ch from hk and in next 2 ch. [(slst, ch 3, 3 Dc) in ch-3 sp of previous row] twice. Turn. (three tiles)
Row 4: Ch 6. 1 dc in 4th ch from hk and in next 2 ch. [(slst, ch 3, 3 dc) in ch-3 sp of previous row] 3 times. Change to color E in last dc of row. Turn. (four tiles)
Row 5: With color E, ch 6. 1 dc in 4th ch from hk and in next 2 ch. [(slst, ch 3, 3 Dc) in ch-3 sp of previous row] 4 times. Turn. (five tiles)
Row 6: Ch 6. 1 dc in 4th ch from hk and in next 2 ch. [(slst, ch 3 3 dc) in ch-3 sp of previous row] 5 times. Change to color A in last dc of row. Turn. (six tiles)
Continue in this manner, increasing one tile every row until there are 44 tiles across. Work stripe pattern as follows:
- [2 rows A, 2 rows E] twice
- [2 rows B, 2 rows E] three times
- [2 rows C, 2 rows E] three times
- [2 rows D, 2 rows E] once (attach color D in last Dc of row)
Row 43: With color D, ch 6. 1 dc in 4th ch from hk and in next 2 ch. [(slst, ch 3, 3 dc) in ch-3 sp of previous row] 42 times. Turn. (43 tiles)
Row 44: Ch 6. 1 dc in 4th ch from hk and in next 2 ch. [(slst, ch 3 3 dc) in ch-3 sp of previous row] 43 times. Change to color E in last dc of row. Turn. (44 tiles)
Row 45: With color E, slst in first 3 dc. *(slst, ch 3, 3 dc) in next ch-3 sp of previous row. Rep from * to last ch-3 sp. Slst in last ch-3 sp. Turn. (43 tiles)
Row 46: Slst in first 3 Dd. *(slst, ch 3, 3 dc) in next ch-3 sp of previous row. Rep from * to last ch-3 sp. Slst in last ch-3 sp. Change to color D in last slst. Turn. (42 tiles)
Continue in this manner, decreasing one tile every row until one tile remains. Work stripe pattern as follows:
- [2 rows D, 2 rows E] once
- [2 rows C, 2 rows E] three times
- [2 rows B, 2 rows E] three times
- [2 rows A, 2 rows E] twice
- [2 rows A] once
- 3 rows E] once
Fasten off and weave in ends.
Border
Round 1: With right side facing, attach color E in same ch-3 sp as last slst. Ch 1 (does not count as st). Evenly space 132 sc each side of the blanket (this works out to be 3 sc for each tile). Join with a slst to first sc. (528 sts)
Do not fasten off. The remainder of the border will be worked in flat rows.
Border Side 1
Row 1 (RS): Ch 10. 1 hdc 2nd ch from hk. 1 hdc in each rem ch.
Slst to next sc (in round 1 of the border). (9 sts)
Row 2 (WS): Ch 1. 1 hdc in BLO of each st. Turn.
Row 3 (RS): Ch 1. 1 hdc in BLO of each st. Sk 1 st in round 1 of border and slst to next.
Row 4 (WS): Ch 1. 1 hdc in BLO of each st. Turn.
Repeat: Rep rows 3 and 4 until you have 2 sts from round one remaining on this side of the baby blanket. End on a row 4.
Next row (RS): Ch 1. 1 hdc in BLO of each st. Slst to last sc from round 1 of the border on this side of the blanket. Fasten off. Side 1 Complete.
Border Side 2
Rotate blanket and work on opposite side. Attach color E to first sc of that side. Rep instructions from border side 1 (row 1 – next row). Side 2 complete.
Border Side 3
Rotate blanket and work on either unworked sides. Attach color E to first sc of that side (it will be a stitch from either side 1 or side 2).
Row 1 (RS): Ch 10. 1 hdc in 2nd ch from hk. 1 hdc in each rem ch.
Slst to next sc (in round 1 of the border). (9 sts)
Row 2 (WS): Ch 1. 1 hdc in BLO of each st. Turn.
Row 3 (RS): Ch 1. 1 hdc in BLO of each st. Sk 1 st in round 1 of border and slst to next.
Row 4 (WS): Ch 1. 1 hdc in BLO of each st. Turn.
Repeat: Rep rows 3 and 4 until you have 2 sts from border side remaining on this side of the baby blanket. End on a row 4.
Next row (RS): Ch 1. 1 hdc in BLO of each st. Slst to last sc from border side on this side of the blanket. Fasten off. Side 3 Complete.
Border Side 4
Rotate blanket and work on opposite side. Attach color E to first sc of that side. Rep instructions from border side 3 (row 1 – next row). Fasten off. Side 4 complete.
By using this pattern, you agree to our terms of use:
This pattern is for personal use only. You agree not to modify, publish, transmit, sell, create derivative works or in any way exploit any of the content within this page, in whole or in part. If you wish to share this pattern, share a link to this webpage only. You may sell finished items made from this pattern.
Copyright, B.Hooked Crochet, LLC
Step-by-Step Tutorial
Video not displaying? Watch this tutorial on YouTube instead.
Left-Handed Tutorial on YouTube


