Do you want to learn how to crochet a granny square? In this guide, I’ll show you the simplest way to crochet this classic crochet square. And as you go through each step, I’ll share secrets for making your granny squares picture-perfect. I’ve included lots of photos and a video tutorial to walk you through it all.
UPDATED: AUGUST 15, 2023 BY BRITTANY
This post may contain affiliate links.

Don’t be fooled by the name—the granny square is far from outdated. In fact, they find their place in contemporary fashion and modern homes.
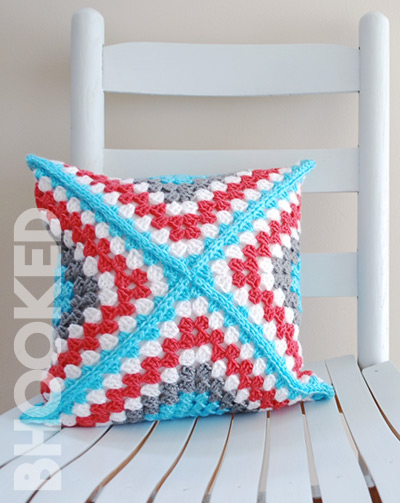
Joining these delightful squares can create trendy scarves, pillows, tops and even purses. So gather your trusty hooks and a bundle of your favorite yarn. With a little practice, you’ll have a stack of perfect squares, ready to be your next finished project.
Learning how to crochet a granny square is a fundamental skill with endless creative possibilities!
Here is a quick overview of the topics we will cover in this article:
- What is a Granny Square?
- Basic Construction
- Classic Granny Square Pattern
- Finishing the Squares
- Step-by-Step Video
- Granny Square Variations
- How Many Rounds Should a Granny Square Have?
- How to Add More Rounds to a Granny Square
- Changing Colors in Granny Squares
- Why Crochet Granny Squares?
- What Crochet Hook Is Best For Granny Squares?
- What Type of Yarn Is Best For Granny Squares?
- The “Granny Lean”
- Tips for Neater Granny Squares
- Should You Block Granny Squares?
- The Easiest Way To Join Granny Squares
- Patterns Using Granny Squares
What is a Granny Square?
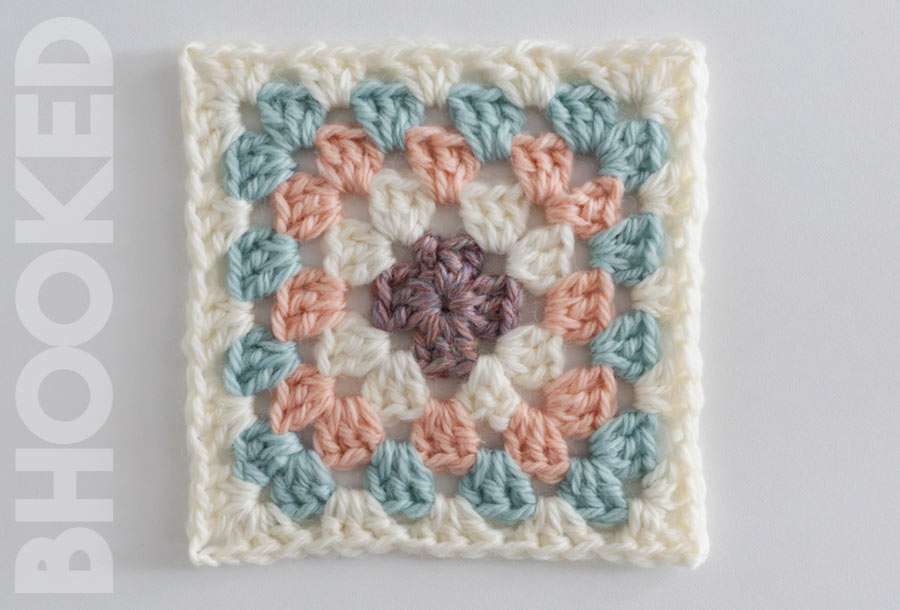
A granny square is a square piece of crochet fabric, that starts from the center and expands outward. It features the classic “granny stitch,” which results in a delightful texture with delicate lace-like holes.
The timeless appeal of this crochet square has endured for over a century. Traditional granny squares are a beginner-friendly project. So they’re an ideal choice for anyone newer to crochet.
Once you’ve made a pile of these little squares, you can join them together to make bigger projects like blankets, scarves, clothing, and even purses.
Basic Granny Square Construction
The classic granny square is crocheted in rounds and worked from the center, outward. Each round is made up of double crochet clusters and this stitch sets this square apart from other square crochet motifs.
“Clusters” are made up of three double crochets and traditionally, they have a chain in between them. But in many modern-day crochet patterns with these squares, you’ll see this chain omitted because it generally yields a neater-looking granny square.
Classic Granny Square Pattern
The traditional granny square pattern has evolved over time. We did an experiment to test all the popular tips to see which ones worked best. Then we were able to curate a pattern that produces the neatest-looking granny square. That’s the pattern you’ll find below.
Supplies
- Yarn: For practice, use medium-weight yarn. You’ll only need a small amount to practice a few rounds.
- Crochet Hook: 4 mm crochet hook.
Using a smaller hook size than you would normally use for a medium-weight yarn is intentional, but we’ll get into why later on. You can use any kind of medium-weight yarn you have on hand. Something that’s smooth, so you can see the stitches well will be the best choice.
Pattern Notes
- Each double crochet cluster is worked in the space between two clusters of the previous round. So you won’t be crocheting directly into stitches for this pattern.
- The side facing you as you crochet is considered the right side of the granny square.
- This crochet pattern is written in US terms.
Three Ways to Start a Granny Square
There are three ways to start the first round: starting in a single chain, starting in a center ring, or using the magic loop. While each option is perfectly acceptable, we prefer to start our granny squares with a center ring. The ring provides enough space to fit all the stitches of the first round, and it’s much more approachable for a beginner than a magic ring.
Stitch Abbreviations
Before you start crocheting, get familiar with the abbreviations below. These are the abbreviations you’ll see in the pattern. For reference, this pattern is written in US terms.
- Bet | Between
- Ch | Chain
- Dc | Double Crochet
- Rem | Remaining
- Slst | Slip Stitch
- Sp | Space
- St(s) | Stitch(es)
Round 1: Ch 3. Join with a slst to the first ch. Ch 5 (counts as dc and ch 2 throughout). In the center of the ring [3 dc, ch 2] 3 times. 2 more dc in the center of the ring and join with a slst in ch-5 sp. Optional: break color A and join color B in the opposite corner.
Round 2: Ch 5. In ch-2 sp, 3 dc. [In next ch-2 sp (3 dc, ch 2, 3 dc)] 3 times. In the first ch-2 sp make 2 dc. Join with a slst in ch-5 sp. Optional: break color B and join color C in the adjacent corner.
Round 3: Ch 5. In ch-2 sp, 3 dc. *In sp bet next 2 dc clusters, 3 dc. In next ch-2 sp (3 dc, ch 2, 3 dc). Rep from * two more times. In sp bet next 2 dc clusters, 3 dc. In the first ch-2 sp make 2 dc. Join with a slst in ch-5 sp. Optional: break color C and join color D in the opposite corner.
Round 4: Ch 5. In ch-2 sp, 3 dc. *[In sp bet next 2 dc clusters, 3 dc] twice. In next ch-2 sp (3 dc, ch 2, 3 dc). Rep from * two more times. [In sp bet next 2 dc clusters, 3 dc] twice. In the first ch-2 sp make 2 dc. Join with a slst in ch-5 sp.
Finishing the Granny Square
After finishing the last round, cut the working yarn (leaving a long enough tail to weave in). Pull the tail through the last stitch to secure it. Then use a yarn needle to weave in the loose ends along the back side of the granny square.
If your granny squares look less than perfect, no worries! It’s pretty common for the corners to be a little rounded and the sides to be a little wavy. That’s why we recommend blocking them before you start joining them together.
This process will “set” the stitches into a perfectly square position so your bag will look more polished and professional.

If you’re unfamiliar with the blocking process, check out our beginner-friendly guide and video here.
How to Crochet a Granny Square Step-by-Step Video
Video not displaying? Watch this tutorial on YouTube instead.
Right-Handed Tutorial on YouTube
SUBSCRIBE TO B.HOOKED ON YOUTUBE
Granny Square Variations
The term “granny square” has somewhat evolved to include an array of variations. It’s often a catch-all name for other crochet shapes like Hexagons, triangles, circles, and more.
One popular variation is the solid granny square. It lacks the traditional lacey appearance of the traditional granny square. To learn how to crochet a solid granny square, check out our complete guide here.
The fun part about granny squares and crochet shapes in general is that you can get really creative with them. You can combine different shapes in the same project to fill gaps. For example, squares can be positioned alongside hexagons for balance.
Here are a few granny square variations that we absolutely love:
- Solid Granny Square
- Hexagon Granny Square
- Sunburst Granny Square
- Granny Square with Flowers
- Circle Granny Square
- Corner to Corner Granny Square
How Many Rounds Should a Granny Square Have?
Most granny square patterns have four or five rounds, but sometimes you might want a bigger one, even a giant square.
So, how do you figure out how many rounds your granny square should be?
First, think about how wide and long you want your project to be and have a clear idea in mind. Since granny squares are perfectly square, you need a number that divides evenly into both dimensions.
For instance, if you’re making a blanket that’s 40 inches wide and 50 inches long, a 5-inch granny square could work because 5 divides evenly into 40 and 50.
But how do you make sure your granny square ends up that size?
You’ll need to try out different yarn thicknesses, hook sizes, and numbers of rounds. Through trial and error, you’ll discover the best combination to make a square with the size you want.
If you can’t find a combination that makes the exact size you need, use the one that’s closest but smaller. Then, wet block the granny squares to get them to the exact size you want.
How to Add More Rounds to Your Squares
Now, let’s talk about adding more rounds to the initial four we’ve shown earlier. As you go on to later rounds, you’ll need to make slight changes in the pattern instructions. But don’t worry, it’s easy to remember!
See that each round of the square has four corners and spaces between clusters.
As you move from one round to the next, the stitch combination for each corner stays the same. What changes from one round to another is the number of double crochet clusters between each corner. As your square gets bigger, the number of double crochet clusters between corners goes up by one.

Look at the third round. Here, you have one cluster between corners. Then, in round four, you have two clusters between corners. And in round five, you have three clusters between corners. That’s the pattern. For every round you add, you’ll have one more cluster between corners. Everything else in the pattern stays the same.
Changing Colors in Granny Squares
When you feel comfortable crocheting granny squares in a single color, try experimenting with more than one color. This is where it really gets fun!
To make the color changes, you’ll fasten off after slip stitching to the chain five space at the end of the round. However, this will create additional ends for you to weave in. To change colors without creating additional ends to weave in, check out our nifty trick in this article. It’ll save you HOURS!
For more information about changing yarn in your crochet projects, check out our complete guide to changing colors in crochet.
Why Crochet Granny Squares?
The appeal of this classic square extends beyond its status as a timeless crochet pattern. These compact companions can go with you wherever you go. And you don’t even have to have a specific project in mind when you start making them.
Another great joy of crocheting granny squares is their versatility. They can transform into all sorts of projects, like baby blankets, afghans, stylish tops, cozy sweaters, decorative pillows, and even fashionable purses. The only limit is your imagination.
Color enthusiasts will find working with them to be a true delight. They provide an open canvas to explore the vibrant world of color, whether you prefer bold and striking hues, elegant solids, or soothing pastels. Mix and match colors freely, whether in random arrangements or intentional patterns—the choice is yours to make.
As if these reasons weren’t enticing enough, here’s another delightful factor: they work up quickly, giving you the satisfaction of completing a tangible piece in mere minutes rather than hours. Each square is a small victory!
What Crochet Hook Is Best For Granny Squares?

It’s tempting to assume that any hook size matching your yarn will work. But our extensive experiment revealed a valuable insight: using a smaller crochet hook makes a neater-looking square.
So the best crochet hook for granny squares is one that’s one or two sizes smaller than the recommended hook size for the yarn.
So if your yarn label says to use a 5.5mm crochet hook, you should actually use a 4mm or 4.5mm for the neatest results.
What Type of Yarn Is Best For Granny Squares?
Traditionally, granny squares are made with medium-weight yarns that have a smooth texture, allowing the pattern and color palette to be the primary focus. However, one of the great things about them is their versatility in accommodating various yarn types. While medium-weight yarns remain a classic choice, it’s fun to experiment with unconventional options.
The “Granny Lean”

You may encounter something known as the “granny lean,” which can leave you wondering how to preserve the square’s straightness. This curious tilt occurs when the corners of the square lean to one side, disrupting the overall symmetry.
Since the granny square is worked in the round without turning the work like in flat pieces, this granny lean can be a real issue. But there are a few things you can do to reduce the lean.
1. Use one hook size smaller than normal
While it may seem far-fetched, I assure you that it’s a tried and true solution. By opting for a smaller hook size, you can create stitches that are slightly tighter and more condensed. This, in turn, helps to reduce the appearance of the granny lean, making it less noticeable. It’s a simple yet effective technique.
2. Start each round in a different corner
If you plan to change colors with every round in your granny square, here’s a fantastic option for you. By joining each round in a different corner, the intensity of the granny lean can be minimized. However, I wouldn’t recommend this approach if you don’t intend to change colors frequently, as it can result in more loose ends to weave in. It’s a trade-off to consider, but worthwhile in some instances.
3. Flip the square after every round
Similar to the previous tip, this technique is recommended only if you intend to change colors with every round because it involves fastening off at the end of each round. That way you can physically flip the square to the other side to start the next round. This stops the granny lean at its source, as each subsequent round will lean in the opposite direction.
If left unattended, the granny lean will become more pronounced the larger your granny square gets, resulting in spiral patterns within your projects and complicating the joining process. Give some of these tips a try and you can get ahead of the granny lean.
Tips for Neater Granny Squares
It’s not uncommon for them to lack that perfect square look right off the hook. You might notice rounded corners, slightly wavy sides, or even a spiral appearance. But fear not, it’s not a reflection of your skills!
Throughout the years, crocheters have shared numerous tricks to make the neatest squares possible. However, the burning question remains: do any of these tips truly work? Well, we’ve taken it upon ourselves to uncover the truth. In our dedicated post, we put them to the test to find out which tricks are worth using.
Let’s dive into the specific elements that contribute to the perfection of our granny square pattern. First – the use of a smaller crochet hook. This simple adjustment not only minimizes the notorious granny lean but also enhances the overall neatness of the square. Just by opting for a smaller hook, you’ll be amazed at how it transforms the final square.
Second – we omit the chain stitch that’s traditionally placed between the clusters of double crochets. This reduces the size of the gaps between the stitches, resulting in a more visually pleasing square. While the gaps are still visible, this simple trick enhances the overall appearance of the square, lending it a more refined and polished look.
Third – we start each round with a chain five, concealing the turning chain within a group of stitches at the end. By doing so, the turning chain becomes less noticeable, giving a more seamless and polished appearance.
Individually, each of these strategies brings noticeable improvements to your granny square. However, when combined and implemented together, they make what we consider to be the perfect granny square.
Should You Block Granny Squares?
Blocking, a straightforward process that enhances the shape of a completed crochet (or knitting) project, can make a significant difference. So the reason you block granny squares is to give it a perfectly square shape that it otherwise won’t have right off the hook (no matter how much experience you have). So if you’ve ever wondered why your squares aren’t flat, or they aren’t perfectly square, chances are it wasn’t blocked.
These squares have not been blocked. Notice the points of the corners are slightly rounded, and the edges aren’t perfectly straight.

We highly recommend taking the time to block your granny squares to achieve perfectly squared results. Not only will this lend a polished and professional appearance, but it will also enhance the overall look when the squares are joined together to form a cohesive project.
So how do you block a them?

The blocking process itself is quite straightforward. Begin by saturating your squares with water, either by dunking them in a filled sink or using a spray bottle. Gently wring out any excess water and proceed to pin the square onto a blocking mat, ensuring it assumes a perfectly square shape. During this step, it’s crucial to stretch the square slightly, applying tension to the stitches. This will allow the square to relax and settle into its new squared position as it dries. For more information about blocking, check out our guide here.
What is the Easiest Way to Join Granny Squares?
There are many ways to join granny squares, each with its own purpose and suitability. But when you need a quick and easy join, you can’t go wrong with the invisible seam. This join gives them a “fused at the edges kind of look”.

You can learn how to do this quick and easy join in our helpful guide here. There’s a video tutorial and written instructions as well.
For more simple ways to join these squares, check out our article here.
Patterns Using Granny Squares
So are you wondering what to make with all of these squares? Here are a few free patterns that we have available using the classic granny square and some familiar variants. We’re always adding to this list so bookmark this page and check back when you need some more granny square inspiration.

*Disclosure: Some of the links in this post are affiliate links, which means as an Amazon Associate, I earn from qualifying purchases made through these links. Please note that prices and availability of products are subject to change. This comes at no additional cost to you and helps support the content on this site. I only recommend products that I have personally used and genuinely believe in. Thank you for your support!