It’s rare for a granny square to look perfectly square right off the hook. So I tested the most popular granny square tips to see which ones (if any) actually work. In this article, I’ll share my findings.
UPDATED: JULY 27, 2023 BY BRITTANY
This post may contain affiliate links.

For decades, the granny square has been a symbol and essence of crochet itself. But if you’ve ever crocheted them, you know they can present some challenges. The spiraling “granny lean”, rounded corners, and a not-so-square shape is often what you’ll see right off the hook.
But clever crocheters over time have found several tips to work around these issues. But the question lingers: do any of these tips work?
Yes, some of the granny squares tips you’ve heard about actually work! Not all as well as others, but I break them all down so you can see first hand, and decide for yourself which ones to use.
In order to find out, I conducted a thorough examination, pitting five commonly suggested granny square tips against each other in a meticulous side-by-side comparison. My goal was to determine which, if any, of these approaches genuinely yield neater and more polished granny squares.
Don’t know how to crochet a granny square yet? No worries! We have a beginner-friendly How to Crochet a Granny Square guide that’ll walk you through it step-by-step.
Here is a quick overview of the topics we will cover in this article:
- Our Baseline Granny Square
- Tip #1: Chain 5 at the beginning instead of a chain 3
- Tip #2: Omit the chain stitch between clusters
- Tip #3: Use a smaller hook size
- Tip #4: Flip the square every round
- Tip #5: Start each round in a different corner
- Our key takeaway from this experiment
- Trying a combination of tips
- So did we make a neater granny square from these tips?
- Watch the experiment video
- Free Granny Square Patterns
- More Granny Square Tricks
What We Hope To Accomplish With This Experiment…
With this experiment, we delve into the realm of traditional granny squares, exploring the various tips that we put to the test. Our aim is to reveal which of these recommendations actually improve the appearance and form of the granny square, while also being upfront about those that may fall short of expectations.
We aim to diminish the notorious spiraling granny lean and see if we can potentially eliminate the need for blocking altogether.
“Blocking” is a technique used in the world of crochet (and knitting) to shape and refine finished crochet projects. It’s used for all sorts of projects, but crochet granny squares can especially benefit from it, and we explore the popular question “Should you block Granny Squares” in our post here. It’s a great place to start if you’re unfamiliar with it as we have step-by-step instructions, and a video to walk you through the process.
Our Baseline Granny Square
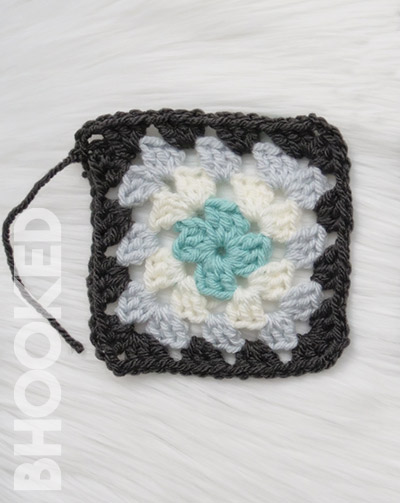
To test these granny square tips, we needed a baseline to compare them to so we could see the difference, if any. This is our baseline granny square and it’s proving our point beautifully with corners leaning to the right, and sides not so straight.
We crocheted this baseline granny square following a standard pattern, where each round starts with three chains, ends with two corner chains, and a single chain is placed between each cluster on the four sides.
When we crocheted each of the test squares after the baseline square, the only thing we changed with the pattern was the tip itself.
Everything else followed the same baseline granny square pattern, and the same acrylic worsted weight yarn was used for all. It’s also important to note, we did not block, stretch or change the way we crocheted any of the squares, aside from the tip itself. Here are the results.
Tip #1 : Chain 5 at the beginning instead of a chain 3.
By keeping the join of each round in the same corner, albeit on a different cluster of double crochet stitches, this tip allows for three out of the five chains to serve as the final stitch of the round, while the remaining two chains form the corner. Conversely, on the baseline, the three starting chains serve as the first stitch of the round. This popular technique piques our curiosity, so let’s explore the results by examining two variations of granny squares.

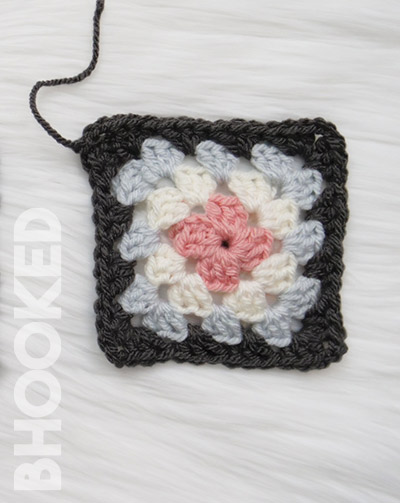
Examine the top left corner of each square, which represents the corner where the join occurs. In the baseline square, we begin with three chains, while in the test square, we start with five chains.
Our assessment reveals that starting with five chains enhances the appearance of the involved corner. It displays a more pleasing shape compared to the baseline square’s starting corner, while the other corners remain unchanged.
One could argue that the lean is reduced in that specific corner, although the other corners appear similar. Although the test square may still require wet blocking, the improvement in that particular corner alone justifies the value of this tip.
Tip# 2 : Omit the chain stitch between clusters of double crochets on the four sides.
One intriguing approach to achieving neater granny squares involves omitting the chain between clusters of double crochets, thereby reducing the gap. The theory suggests that this modification can result in a more polished appearance. To put this concept to the test, let’s examine the resulting squares and evaluate the impact of this alteration.
Both of these squares were crafted using a 5.5 mm crochet hook, so observe their respective sizes attentively. By omitting the chain between the clusters on the sides (while retaining the corner chains), the resulting square appears marginally smaller. However, this size discrepancy should not pose a significant issue as long as consistency is maintained throughout the project.
In our evaluation, we noticed that the lean, although still present, seemed slightly less pronounced. The absence of the chain between the clusters contributed to more uniform gaps, lending an overall tidier appearance to the square.
While this tip did not completely eradicate the lean, it undeniably made a noticeable improvement in the square’s tidiness. As a result, we deem this tip worthwhile for achieving a neater overall look.
Tip #3 : Use a hook that’s one size smaller than what you’d normally use.
One popular theory suggests that using a smaller hook can result in more compact stitches, resulting in a neater appearance and increased stability that minimizes the notorious lean. While this approach may indeed yield tighter and sturdier stitches, it’s important to consider the potential impact on the overall size of the square. To witness the effects firsthand, let’s delve into the practical implementation of this technique.

These two squares were crocheted using identical patterns by the same person being careful to maintain the same tension. The only distinction between the two is the hook size. The baseline square was crocheted using a 5.5 mm hook, while the test square utilized a single hook size smaller, a 5 mm. As expected, a noticeable difference in size was observed.
In our evaluation, we found that employing a smaller hook significantly enhanced the shape of the square and notably diminished the granny lean. The resulting square exhibited an appealing appearance, and it really wouldn’t be necessary to block it. We confidently deem this tip a resounding success.
Tip #4 : Flip the square every round.
This tip makes a lot of sense when trying to get rid of the granny lean. The lean consistently occurs in the direction of the round (counterclockwise for right-handed crocheters or clockwise for left-handed crocheters), suggesting that the absence of flipping the work is the likely cause. Now, let’s delve into the results of our comprehensive side-by-side test to see how this tip performed.
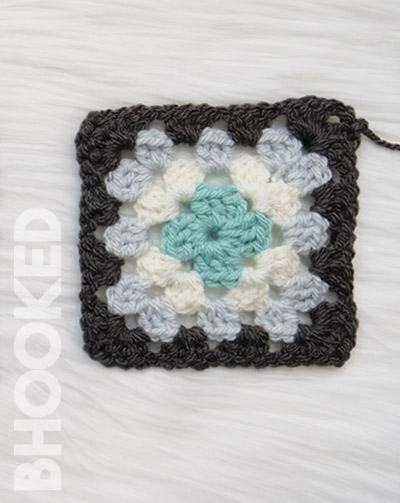
The results were pretty impressive. However, closely observe the appearance of each round in the test granny square. Notice that they display slight differences, particularly in the white and dark gray rounds. This discrepancy arises from the fact that the front and back sides of a double crochet look a little different from one another.
Our evaluation concludes that flipping the square every round significantly improved its shape and appeared to eliminate the granny lean altogether. Given the positive outcome, one might not feel the need to block this particular square. If you’re comfortable with the slightly varied appearance of each round, this tip unquestionably passed the test.
If you’re worried about the extra ends this granny square tip will create, check out the clever trick we share in this article so you don’t create any additional ends!
Tip #5 : Start each round in a different corner.
Given that the granny lean appears to stem from the corners, it seems logical to speculate that altering the corner origin could disrupt the lean’s flow. However, it is important to acknowledge the clear downside of this approach.
Shifting the starting corner would require additional cutting and consequently, more ends to weave in. Unless you intend to change colors with every round, this option may not be practical. Nevertheless, let’s explore its potential nonetheless.

In the baseline granny square, each subsequent round starts in the top left corner, while in the test square, each new round initiates in the corner positioned behind the last round.
In our evaluation, we observed that starting in a different corner for each round marginally reduces the granny lean. However, this option remains viable only if you intend to change colors with every round.
Despite the test square exhibiting a relatively pleasing appearance, it would still be advisable to block it to further mitigate the lean and enhance its overall shape. Therefore, we deem this tip as ineffective in addressing the granny lean concern.
This was a pretty eye-opening experiment.
The key lesson we took away from this experiment was that while several tips yielded improvements in specific aspects of the square, only one tip made a significant difference to the square as a whole without altering its classic appearance.
While many of the tips initially seemed logical, the most surprising revelation was the effectiveness of tip #3: using a smaller hook. We can confidently recommend that by simply decreasing the hook size, you can achieve a neater and more polished granny square. This finding prompted us to wonder the outcome of combining a selection of our favorite tips in a single granny square.
Since this experiment, we’ve tried implementing the same tips for other variations of granny squares like the solid granny square as well as the flower granny square we have available for you in free pattern and tutorial form. We found that using the same combination of tips in the next section works to improve the look of these other granny square variations too.
Using a combination of tips
What if we amalgamate our favorite tips from each individual test…can we create an even more immaculate-looking granny square? To satisfy our curiosity, we made a new test square to find out, and here’s what we discovered.
Among the five individual tests, we identified our preferred techniques, which we subsequently combined into one final square:
- Starting With 5 Chains
- Omitting the chain between clusters of double crochets
- Using one hook size smaller
Therefore, we present both our baseline granny square and the test square, incorporating our preferred combination of tips.

We find the resulting combination square to be visually appealing, but how does it compare to the square from tip #3, which solely utilized a smaller crochet hook? Our curiosity led us to investigate whether the additional effort was truly warranted, or if achieving neater granny squares simply entailed using a hook size smaller than usual.
Both options exhibit an impressive appearance, with the square incorporating the combination of tips arguably appearing slightly neater. However, the primary objective of this experiment was to discover a method to crochet neater granny squares without encountering the issue of granny lean and without the need for blocking. In that regard, we believe that both of these squares successfully fulfill the criteria.
So did we produce neater granny squares with this experiment?
It is evident that by utilizing a slightly smaller crochet hook, one can significantly reduce th granny lean and, more importantly, avoid the need for wet blocking when working on a granny square project.
In our experience, using a smaller hook size alongside a slightly modified granny square pattern resulted in the neatest granny square, surpassing the individual tips we explored. However, combining multiple tips ultimately yielded a granny square with the best overall shape and minimal granny lean.
We can’t help but wonder whether our crochet style, and how we hold the hook may also contribute to the prominence of granny lean or a granny square with less than perfect shape. Since changing how we crochet isn’t easily achieved, we encourage you to use our findings as a starting point for your own granny square experiments. Create a few test squares and assess which techniques produce neater granny squares based on your personal crochet style.
We put these granny square tips to the test. Here’s what we found.
Video not displaying? Watch this tutorial on YouTube instead.
Free Granny Square Patterns
Here are a few free patterns that we have available using the classic granny square and some familiar variants. We’re always adding to this list so bookmark this page and check back when you need some more granny square inspiration.
What Other Granny Square Tricks Make Perfect Squares?
At B.Hooked, we’re passionate about granny squares and dedicated to providing a wealth of resources to help you create the most stunning versions. If you haven’t yet discovered the magic of “wet blocking,” we highly recommend exploring this technique. We’ve prepared a comprehensive guide, similar to the one you’re currently reading, that will carefully walk you through the process, step-by-step.
*Disclosure: Some of the links in this post are affiliate links, which means as an Amazon Associate, I earn from qualifying purchases made through these links. Please note that prices and availability of products are subject to change. This comes at no additional cost to you and helps support the content on this site. I only recommend products that I have personally used and genuinely believe in. Thank you for your support!