This post may contain affiliate links. See our Disclosure Policy for more information.
Perfect for last minute gifts or quick wins inbetween larger projects.
Skill Level | Beginner
Available Sizes | Child, Teen, Adult

About this Pattern
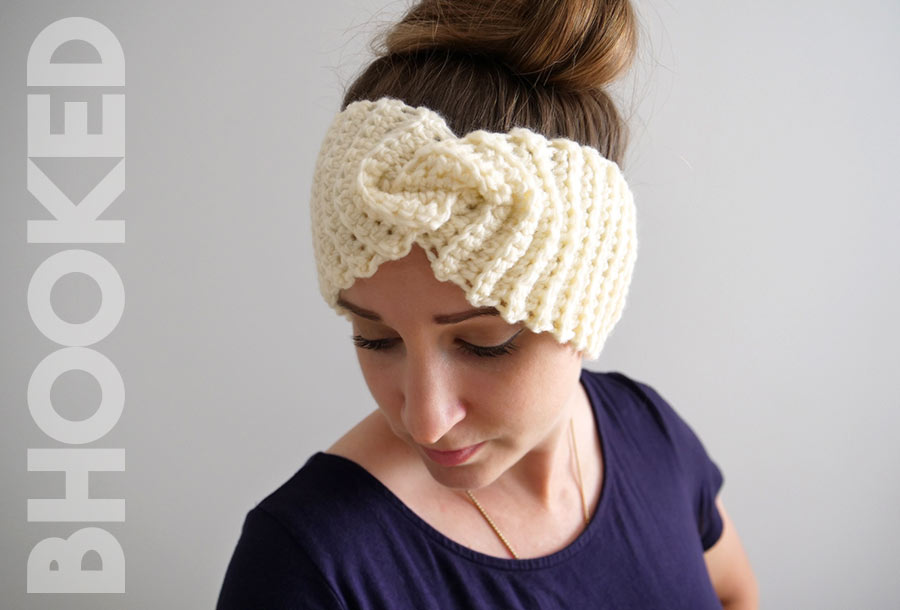
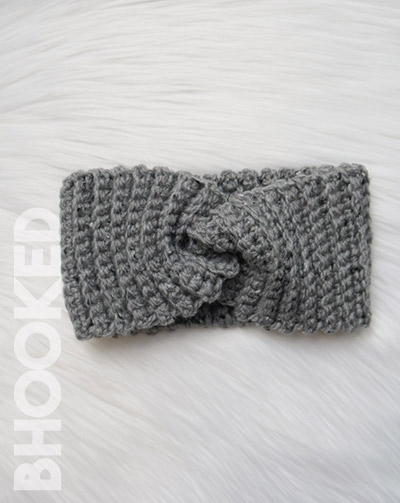
If you’re looking for a quick project for a last-minute gift idea or you just need a quick win between larger projects, you’re in the right place. Our simple ribbed crochet headband works up quickly with bulky weight yarn and is easy enough for a true beginner.
With this project, you’ll get to practice your single crochet ribbing skills and learn a joining technique that creates a really cute shape for a headband. Use it with pretty much any stitch, for any headband, knitting, or crochet.
Before you begin, review this page entirely so you understand the full scope of the project. We have a list of recommended supplies and abbreviations here on this page as well as written instructions and a tutorial to walk you through our simple ribbed crochet headband from start to finish.
Recommended Supplies
- Approx 45(60, 70) yds; Patons Shetland Chunky Yarn (Colorway pictured: Aran and Pewter Tweed)
- 6 mm Crochet Hook
- Yarn Needle
- Scissors
Abbreviations
This pattern is written using standard US crochet terminology.
- BLO Back Loop Only
- Ch Chain
- Hk Hook
- Rem Remaining
- Rep Repeat
- St(s) Stitch(es)

Additional Notes
Finished Size Fits
- Child | 18-20″ circumference; 3″ width
- Teen | 20-22″ circumference; 3.5″ width
- Adult | 21-23″ circumference; 3.75″ width
Gauge
13.5 sts x 15.5 rows = 4″
(stitch pattern)
This pattern is worked in a long flat piece using a classic crochet ribbing pattern. The chain one at the beginning of each row does not count as a stitch. Negative ease is incorporated in the pattern because the stitch pattern is incredibly stretchy. This promotes a snug fit that’ll keep your ears warm.
Additional Notes: Instructions for sizes are given as follows:
Child(Teen, Adult)
Need to print this pattern?
You’ll find the full pattern for free here on this page. However, if you’d like to have a PDF version to print or save for offline use, you can purchase it from our shop.
Written Instructions
Row 1: Ch 11(13, 14). Sc in 2nd ch from the hk and in each rem ch. Ch 1 and turn. (10, 12, 13 sts)
Row 2: 1 sc in the BLO of the first st and each rem st.
Repeat: Rep the last row until work measures 14.5(16.5, 17.5)” from starting edge. Fasten off leaving an 8” tail.
Assembly/Finishing
Step 1: Lay the headband on a flat surface. At one end, fold the two corners together, holding it with your fingers (folding in half width-wise). Do the same on the other side.
Step 2: Bring the two folded ends together, sliding one half of either fold inside the other. This will create four layers.
Step 3: With yarn needle and long tail make a seam, catching all four layers.
Step 4: Weave in ends and turn right-side out.
By using this pattern, you agree to our terms of use:
This pattern is for personal use only. You agree not to modify, publish, transmit, sell, create derivative works or in any way exploit any of the content within this page, in whole or in part. If you wish to share this pattern, share a link to this webpage only. You may sell finished items made from this pattern.
Copyright, B.Hooked Crochet, LLC
Step-by-Step Tutorial
Video not displaying? Watch this tutorial on YouTube instead.
Left-Handed Tutorial on YouTube