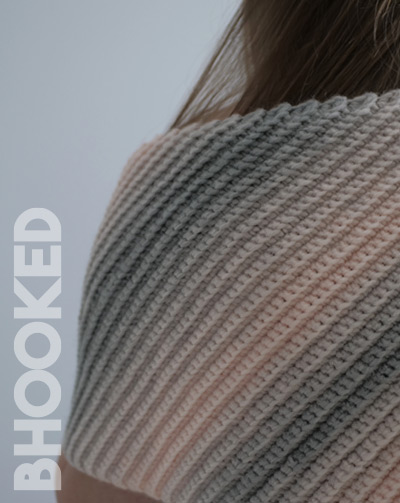
This gorgeous shawl plays on the shape of a traditional crescent but incorporates a little flare making it one of the more interesting shawl shapes you’ll ever crochet.
Skill Level | Easy
Finished Size | 94″ wide; 14″ (longest point)


About this Pattern
If you’re looking for a shawl you’ll actually want to finish, our whimsical crochet shawl is a great place to start. It starts off like a crescent but sweeps in the opposite direction so it’s shaped more like an “s”. It’s longer and shorter than traditional shawls which makes it perfect for layering and wrapping in many ways.
With this project you’ll get to practice working with strategically placed increases and decreases which work together to create the unique shape. Finding a happy balance between interesting but not too challenging is the key to make sure you don’t “fall out of love” with your project and between the shape and gorgeous color transitions of this shawl, we believe it will keep your attention from start to finish.
Before you begin, review this page entirely so you understand the full scope of the project. We have a list of recommended supplies and abbreviations here on this page as well as written instructions and a tutorial to walk you through our whimsical crochet shawl step-by-step.
Recommended Supplies
- Approx 635 yds; Lion Brand Scarfie (Colorway pictured: pink/silver)
- 5 mm Crochet Hook (head)
- Yarn Needle
- Scissors
Abbreviations
This pattern is written using standard US crochet terminology.
- BLO Back Loop Only
- Ch Chain
- Hk Hook
- Rem Remaining
- Rep Repeat
- Sc Single Crochet
- Sc2Tog Single Crochet 2 Together
- Sc3Tog Single Crochet 3 Together
- Sk Skip
- Slst Slip Stitch
- St(s) Stitch(es)
Additional Notes
Finished Size
94″ wide; 14″ (longest point)
Gauge
21 stitches x 18 rows = 4″
worked in stitch pattern
Additional Notes:
This shawl is worked from one side to the other. The first section consists of increases and decreases that net a positive number of stitches so it will grow to the midpoint. The second section also consist of increases and decreases but they net negative so the number of stitches decrease.
Ch 1 at beginning of row does not count as a stitch.
Need to print this pattern?
You’ll find the full pattern for free here on this page. However, if you’d like to have a PDF version to print or save for offline use, you can purchase it from our shop.
Written Instructions
Increase Section
Row 1: Ch 2. Sc in 2nd ch from hk. Ch 1 and turn.(1 st)
Row 2: 2 sc BLO every st. Ch 1 and turn. (2 sts)
Row 3: 1 sc BLO every st. Ch 1 and turn.
Row 4: 1 sc BLO first st. 3 sc BLO last st. Ch 1 and turn. (4 sts)
Row 5: 1 sc BLO every st. Ch 1 and turn.
Row 6: 1 sc BLO first st. 1 sc BLO each st to last. 3 sc BLO last st. Ch 1 and turn. (6 sts)
Row 7: 1 sc BLO every st. Ch 1 and turn.
Row 8: Working BLO, sc2tog. 1 sc BLO each st to last. 3 sc BLO last st. Ch 1 and turn. ( 7 sts)
Row 9: 1 sc BLO each st. Ch 1 and turn.
Repeat: Rep last two rows to 76 sts ending after a 9th row.
Decrease Section
Row 1: Working BLO, sc2tog three times. 1 sc BLO each st to last. 3 sc BLO last st. Ch 1 and turn. (75 sts)
Row 2: 1 sc BLO each st. Ch 1 and turn.
Repeat: Rep last two rows to 7 sts ending after a 2nd row.
Next Row: Working BLO, sc2tog three times. 3 sc BLO last st. Ch 1 and turn. (6 sts)
Next Row: 1 sc BLO each st. Ch 1 and turn.
Next Row: Working BLO, sc3tog. Sc2tog. 3 sc BLO last st. (5 sts)
Next Row: 1 sc BLO each st. Ch 1 and turn.
Next Row: Working BLO, sc2tog twice. 2 sc BLO last st. Ch 1 and turn. (4 sts)
Next Row: 1 sc BLO each st. Ch 1 and turn.
Next Row: Working BLO, sc2tog twice. Ch 1 and turn. (2 sts)
Next Row: 1 sc BLO each st. Ch 1 and turn.
Next Row: Working BLO, sc2tog. Fasten off and weave in ends.
By using this pattern, you agree to our terms of use:
This pattern is for personal use only. You agree not to modify, publish, transmit, sell, create derivative works or in any way exploit any of the content within this page, in whole or in part. If you wish to share this pattern, share a link to this webpage only. You may sell finished items made from this pattern.
Copyright, B.Hooked Crochet, LLC
Step-by-Step Tutorial
Video not displaying? Watch this tutorial on YouTube instead.

